WPForms is one of the most user-friendly WordPress plugins for creating custom forms without any coding knowledge. Whether you want to create contact forms, surveys, payment forms, or subscription forms, WPForms makes the process seamless. This guide will walk you through the process of installing and setting up the WPForms plugin step-by-step.
Why Choose WPForms?
WPForms stands out for its intuitive drag-and-drop builder and its versatility. Here are some key benefits:
| Feature | Description |
|---|---|
| Ease of Use | Drag-and-drop interface requires no technical expertise. |
| Pre-built Templates | Access to a library of customizable form templates. |
| Integrations | Seamless integration with email marketing platforms like Mailchimp and PayPal. |
| Mobile Responsiveness | Forms look great on any device. |
| Advanced Features | Features like conditional logic and file uploads for Pro users. |
With WPForms, even a beginner can create professional forms in minutes!
Prerequisites for Installation
Before installing WPForms, ensure that you meet the following requirements:
- A WordPress Website: WPForms is a WordPress plugin, so you need an active WordPress installation.
- Administrator Access: You must have admin rights to install and activate plugins.
- Hosting: A compatible hosting provider such as Bluehost or SiteGround is recommended.
- PHP Version: Ensure your hosting supports PHP 7.4 or higher.
How to Install WPForms Free Version
The free version of WPForms, called WPForms Lite, is available directly from the WordPress plugin repository. Follow these steps:
- Log in to Your WordPress Dashboard
- Navigate to
https://yourwebsite.com/wp-adminand enter your credentials.
- Navigate to
- Go to the Plugins Section
- On the left-hand menu, click on Plugins > Add New.
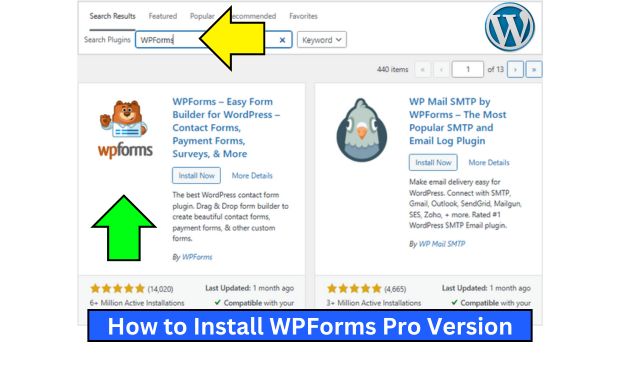
- Search for WPForms
- In the search bar, type WPForms. Locate the plugin called WPForms Lite by WPForms.
- Install the Plugin
- Click the Install Now button.
- Once installed, click Activate.
- Access WPForms
- After activation, you’ll find a new menu item labeled WPForms on your dashboard.
Pro Tip: You can install WPForms Lite on a staging site to test its functionality before deploying it on a live website.
How to Install WPForms Pro Version
The Pro version unlocks advanced features like payment integrations, file uploads, and more. Here’s how to install it: LiteSpeed Cache Plugin Setup for WordPress.
Step 1: Purchase WPForms Pro
- Visit the WPForms website and select a pricing plan that suits your needs.
- Complete the purchase and log in to your WPForms account.
- Download the plugin’s .zip file from the Downloads section.
Step 2: Upload and Activate the Plugin
- Go to the Plugins Section
- In your WordPress dashboard, click on Plugins > Add New > Upload Plugin.
- Upload the .zip File
- Click Choose File, select the .zip file downloaded earlier, and click Install Now.
- Activate WPForms Pro
- Once installed, click Activate Plugin.
Step 3: Enter Your License Key
- Navigate to WPForms > Settings in your WordPress dashboard.
- Enter the license key provided in your WPForms account.
- Click Verify Key to enable Pro features.
Note: Keep your license key handy for future updates.
Basic Configuration After Installation
Once WPForms is installed, configure the following settings:
- Email Notifications
- Go to WPForms > Settings > Notifications.
- Customize notification emails to ensure you receive form submissions promptly.
- Integrations
- Set up integrations with email marketing services, payment gateways, or CRMs under the Integrations tab.
- Captcha Settings
- Protect your forms from spam by enabling reCAPTCHA or hCaptcha.
Creating Your First Form
Follow these steps to create your first form:
- Open the Form Builder
- Navigate to WPForms > Add New.
- Choose a Template
- Select from pre-built templates like Simple Contact Form, Newsletter Signup, or Blank Form.
- Customize the Form
- Drag and drop fields to add elements like text boxes, dropdowns, or checkboxes.
- Adjust field settings by clicking on each field.
- Save the Form
- Click Save to store your form for later use.
Example: A Simple Contact Form typically includes fields for Name, Email, and Message.
Embedding WPForms on Your Website
Once your form is ready, you can embed it on your website:
- Copy the Shortcode
- Go to WPForms > All Forms. Find the form you created and copy its shortcode.
- Add the Shortcode to a Page or Post
- Edit the desired page or post.
- Paste the shortcode where you want the form to appear.
- Use the WPForms Block (Optional)
- If using the block editor, add the WPForms block and select your form from the dropdown.
- Preview and Publish
- Preview the page to ensure the form appears correctly, then click Publish.
Troubleshooting Common Issues
| Issue | Solution |
| Forms Not Displaying Properly | Ensure the shortcode is correct and there are no conflicting plugins or themes. |
| Emails Not Being Sent | Check SMTP settings or use an email plugin like WP Mail SMTP. |
| License Key Not Working | Verify the key’s validity and ensure it’s entered correctly. |
| Plugin Update Issues | Check file permissions or update manually via FTP. |
Tip: Always keep WordPress, themes, and plugins updated to minimize compatibility issues.
Conclusion
Installing WPForms on your WordPress site is a straightforward process, whether you choose the free or Pro version. With its user-friendly interface and powerful features, WPForms empowers you to create and manage forms efficiently. By following this guide, you’ll have WPForms up and running in no time, ready to handle everything from contact inquiries to payment submissions.
Start experimenting with WPForms today to see how it can simplify form creation for your website! How to Create a WordPress Website for Beginners.